Installing free SSL/TLS Certificates from Let's Encrypt on IIS in Windows Server
The number one obstacle preventing people from switching their websites from HTTP to HTTPS is obtaining and managing certificates. With the introduction of Let’s Encrypt, this obstacle has been removed. Let’s Encrypt is a free, automated, and open Certificate Authority. Their mission is to get everyone running websites on HTTPS. Continue reading to find out how to get free, browser trusted SSL/TLS certificates.
Difference between HTTP and HTTPS?
Websites that use HTTP send data entered in form fields from your browser across the internet to the destination website in plain text. This means that anyone monitoring your network would be able to read your data whilst it is in transit.
When using HTTPS, data sent to the website from your browser will be encrypted. Eavesdroppers on your network won’t be able to read the information you’ve sent from your browser on the way to the website. This is extremely important when entering sensitive data such as usernames and passwords.
The internet is slowly moving towards HTTPS. In an attempt to speed this up search engine algorithms are starting to rank HTTPS sites higher up in search results. Google Chrome now highlights HTTP sites explicitly as “Not secure” so it’s worth changing to give your users peace of mind.
How to enable HTTPS on IIS
In this tutorial I will go through the simple steps involved in obtaining and installing valid Let’s Encrypt SSL/TLS certificates on websites hosted on IIS in Windows Server. I’ll be using the default website that comes with IIS as an example, but these steps apply to any other website, web application or web API.
Before we start there are a few things to note:
- Let’s Encrypt only provide DV (Domain-validated) certificates.
- The SSL/TLS Certificates only last 90 days, but will be automatically renewed before then.
- There is a limit to how many certificates you can generate per week.
1. Create a self-signed certificate in IIS
This step is optional. Before we request a production certificate, let’s create a self-signed certificate to test that we can serve HTTPS pages from our server.
- Open IIS and click on the server node in the left-hand tree.
- Open “Server Certificates”.
- Click “Create Self-Signed Certificate…” on the right and Give it a name.
- Drill down to the “Default website” node in the left-hand tree.
- Click on “Bindings…” and add a new binding.
- Select the type as HTTPS, port as 443 and choose your self-signed certificate from the SSL certificate dropdown then close the window.
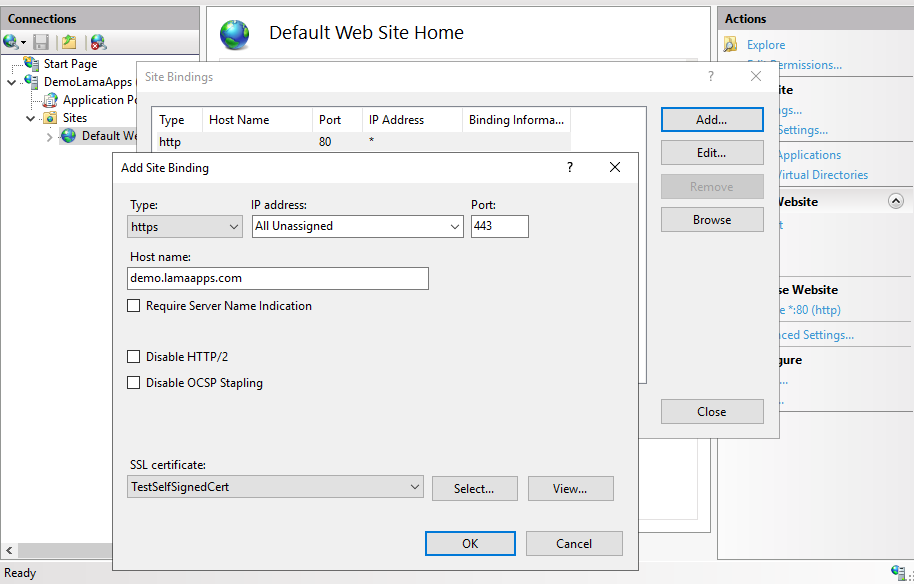
Now when you go to the https version of your website it should load. However, Google Chrome will flag it as not secure because the certificate is not valid. This is what we want because now we know that the webserver is all set up to allow HTTPS connections. We are ready to proceed.

If the website doesn’t load or keeps spinning, check that your firewall and cloud host provider accepts inbound TCP connections to port 443.
2. Install Windows ACME Simple (WACS)
The protocol for getting Let’s Encrypt certificates is called ACME (Automated Certificate Management Environment) . We’ll need to install an ACME client to submit requests for the free SSL/TLS certificates. Since Let’s Encrypt certificates expire after 3 months, this ACME client creates a scheduled task for automatic renewals that request new ones a couple weeks before they’re set to expire.
There are many ACME clients available but we’ll use
win-acme
by PKISharp. Download the latest release of win-acme and extract its contents to a folder on your hard drive, c:\LetsEncrypt in this example.
The version of win-acme used at the time of writing this article was v2.0.6.284
3. Generate the Let’s Encrypt certificate and setup auto renew
- Open up PowerShell and run
cd c:\LetsEncrypt Run
.\wacs.exe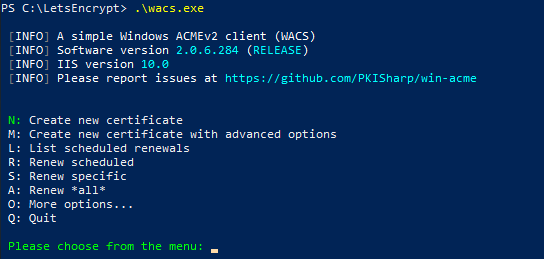
Press N to Create new certificate.
We just have a single site in this example so Press 1 for Single binding of an IIS site. SAN certificates that allow for multiple subdomains are also supported.
Choose the binding. Again, we only have one site so Press 1.
Provide the email(s) for notifications about problems should automatic renewals fail. You can leave this blank and continue. (This email address will not be made public)
Agree and Accept their terms and conditions then let win-acme do its thing then you are done!
4. Verify everything is up and running
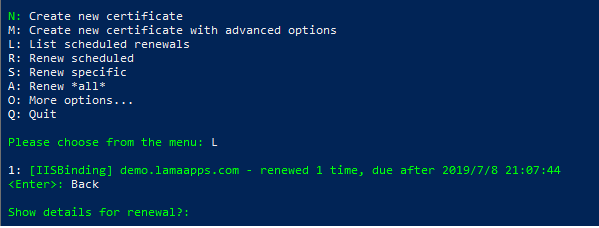
Press L from win-acme client’s main menu to see that automatic renewals have been created. Here you can view the details for the next renewal.
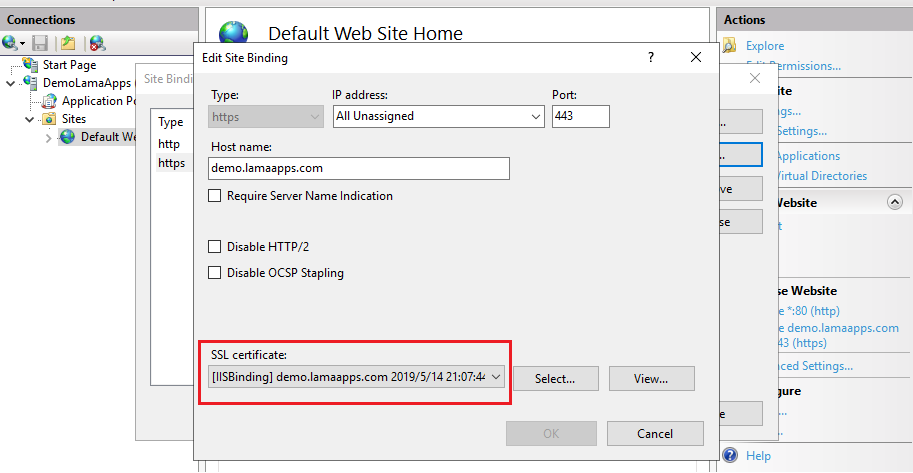
Look at the bindings for HTTPS in IIS and you should see your certificate is selected.
Now when you navigate to the HTTPS version of the URL, it shows up as secure in Chrome.
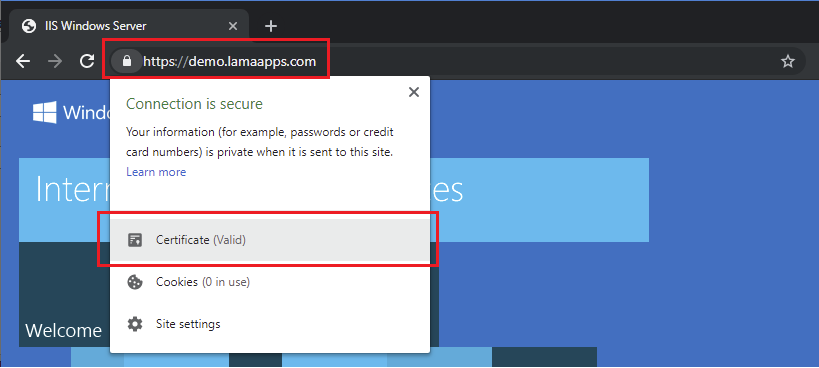
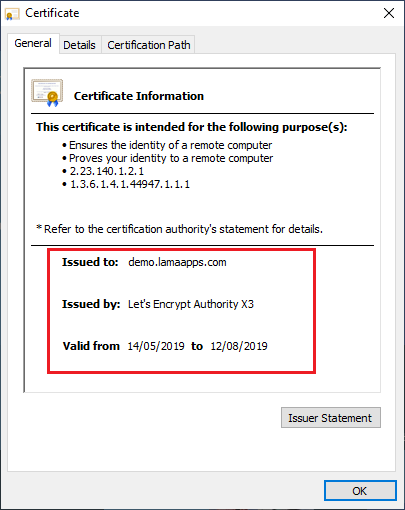
Click through to view the certificate.
To redirect all incoming HTTP traffic to the HTTPS version, you can install Microsoft URL Rewrite Module and configure the redirects. It’s beyond the scope of this tutorial but see here for more information.
Let’s Encrypt certificates are widely used by many companies and are trusted by all browsers. If you’ve found this article helpful, please subscribe below to Lama Apps and get notified of new posts.